It’s been so exciting to share our new UI with everyone. We’ve been receiving loads of wonderful feedback, but our work is not finished!
The purpose of the new UI is to align with our brand name change (read about that here) and unify the customer’s experience so that functions like ‘Integrations’, ‘Settings’ and ‘Categories’ are where they are expected to be. In other words, less clicking, more uploading!
We want our interface to be more intuitive and easier for customers to navigate.
On a more technical note, it’ll also mean our Dev Team can implement new features more easily.
You’ll notice that the new UI is in BETA mode, and that means we aren’t quite done. We are welcoming feedback and it’s proving to be critical to us, because our customers will naturally be the ones we look to for advice. We want to hear about anything and everything relating to the new UI. Send us an email.
The New Process
While the process of uploading your receipts remains mostly the same, the workflow might have changed because, well, buttons are in different places now.
We’d like to help you with this transition and make a process workflow suggestion. Check it out:
1- Submit your documents via our different methods: email, mobile app, web uploader, scanner, email forwarding and post.
See their status in the ‘Submit’ tab. Either it’ll be awaiting data entry by our team, or it’ll be waiting to be edited and saved by you (if you are on a DIY plan)

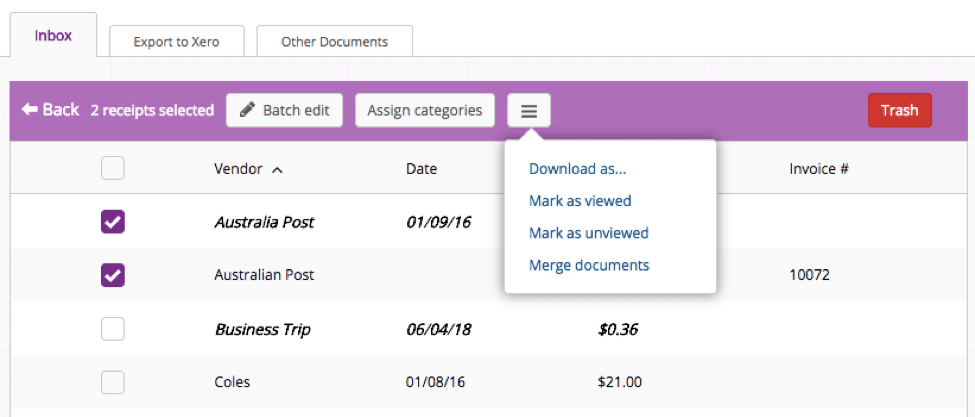
2- Go to ‘My Documents’ to begin verifying your documents. Your “Inbox” contains your receipts and invoices. Here, you can now choose which columns to view at a time.
Hot tip: Use this feature in conjunction with the filter and sort functions to find duplicates.
3- Select some documents to view the different functions available.
4- If you integrate the account with accounting software, head on over to the “Export to –” tab. This will display everything that hasn’t already exported.

5- This tab also streamlines the process for adding GL (General Ledger) codes to your receipts, as well as easily adding rules. Click in any box below “GL codes” and, from the drop down menu that appears, assign the appropriate category to the matching receipt.
Click on the “+” sign to the right of the assigned category, and you’ll create a rule for that vendor!
6- The good news is that you can selectively export to your software from this page, using the check boxes to the left of this page, and clicking on “Export Selected”. (The default is to export all.)

7- When you’re done, give yourself a clap and grab a cup of tea 🙂
For a detailed look at what has changed, head over to our FAQ article here.